
I love sharing recipes that bring joy with every bite, and my Peanut Butter Cup Spider Cookies Recipe is exactly that kind of treat. These cookies have a perfect balance of rich peanut butter flavor, chewy texture, and the surprise of melty peanut butter cups nestled right in the center. I adore how the chocolate legs make them quirky and fun—ideal for gatherings or just a comforting snack. Whenever I make these, they disappear fast, and I’m excited to share how you can enjoy making and eating them too!
Why You’ll Love This Peanut Butter Cup Spider Cookies Recipe
What truly excites me about this Peanut Butter Cup Spider Cookies Recipe is how it combines classic peanut butter cookie goodness with a fun twist. The flavor is just divine—the creamy peanut butter and brown sugar create a warm, sweet base that perfectly complements the gooey peanut butter cups in the center. And don’t forget the chocolate spider legs! They add a playful crunch and an extra dose of chocolate that makes each bite memorable. It’s like peanut butter cookie magic in spider form.
Aside from the delicious taste, I always appreciate a recipe that’s straightforward but feels special. This one is so easy to prepare—I love simply mixing the ingredients, shaping the dough, and then letting the refrigerated cookies bake to golden perfection. The chilling step gives the cookies a great texture, and adding the peanut butter cups and chocolate legs right before serving makes them visually impressive without extra fuss. Whether it’s a holiday party, a cozy night in, or a fun Halloween treat, these cookies always impress and delight.
Ingredients You’ll Need

All the ingredients in this Peanut Butter Cup Spider Cookies Recipe are simple and pantry-friendly, yet each plays a vital role in creating the perfect flavor and texture. From the creamy peanut butter to the melty chocolate, every component works together beautifully.
- ½ cup butter (1 stick, room temp): Adds richness and moisture to keep the cookies soft and tender.
- ¾ cup granulated sugar: Provides sweetness and helps achieve a slightly crisp edge.
- ¼ cup packed brown sugar: Brings a lovely caramel note and chewy texture.
- 1 cup creamy peanut butter: The star flavor, giving the cookies their signature nutty taste.
- 1 large egg: Binds everything together and adds structure.
- 1½ teaspoons vanilla bean paste or extract: Adds depth and warmth to the flavor.
- 1½ cups flour (spooned and leveled): Creates the perfect base for a soft yet sturdy cookie.
- 1 teaspoon baking soda: Helps the cookies rise and become tender.
- ½ teaspoon baking powder: Provides a slight lift for a light texture.
- ¼ teaspoon kosher salt: Balances sweetness and enhances all the flavors.
- ¼ cup milk chocolate melted: Used to pipe the fun spider legs, adding a smooth chocolate finish.
- 8 full-size peanut butter cups: The gooey center surprise that makes these cookies stand out.
Directions
Step 1: Preheat your oven to 350°F (175°C) and line a baking sheet with parchment paper to prevent sticking and ensure even baking.
Step 2: In a large mixing bowl, cream together the softened butter, granulated sugar, and brown sugar until the mixture is light, fluffy, and well combined. This is where the cookie base starts to develop its soft texture.
Step 3: Add the creamy peanut butter, egg, and vanilla bean paste to the bowl and mix until everything is fully incorporated and smooth. The aroma at this stage is absolutely amazing!
Step 4: In a separate bowl, whisk together the flour, baking soda, baking powder, and kosher salt. Gradually add this dry mixture to the wet ingredients, stirring just until combined. Avoid overmixing to keep the cookies tender.
Step 5: Using an ice cream scoop or spoon, scoop two dough balls and gently stack one on top of the other. Press an indentation into the top cookie using the back of the scoop to create a little well for the peanut butter cup. Repeat for the rest of the dough.
Step 6: Place the shaped cookies on the prepared baking sheet and refrigerate for 30 minutes. This chilling step is key for a lovely texture and to prevent spreading.
Step 7: Bake the chilled cookies for 15 to 20 minutes or until the edges become lightly golden and the centers are set but still soft. Let them cool on the baking sheet for one minute.
Step 8: While still warm, gently press down the center of each cookie again with a ½ cup measuring cup to re-establish the indentation. Allow cookies to cool for another 5 minutes before transferring them to a wire rack.
Step 9: Meanwhile, melt the milk chocolate in the microwave in 20-second bursts, stirring between intervals until smooth and glossy—this will be perfect for piping the spider legs.
Step 10: Once the cookies are completely cooled, place one full-size peanut butter cup in the indentation of each cookie. Use a piping bag or a small plastic bag with a corner snipped off to pipe eight chocolate spider legs from the peanut butter cup outward. For an extra twist, I sometimes add a thin layer of raspberry or strawberry jam beneath the peanut butter cup for a fruity contrast.
Servings and Timing
This recipe yields about 8 large, generously sized cookies, perfect for sharing with family or friends. The prep time is roughly 20 minutes, but with the chilling and baking times included, you’re looking at about 1 hour total from start to finish. The 30-minute refrigeration step is essential to get the perfect texture, so don’t skip it. Cooling time takes about 10 minutes before decorating, so plan accordingly if you’re making these for a special occasion.
How to Serve This Peanut Butter Cup Spider Cookies Recipe
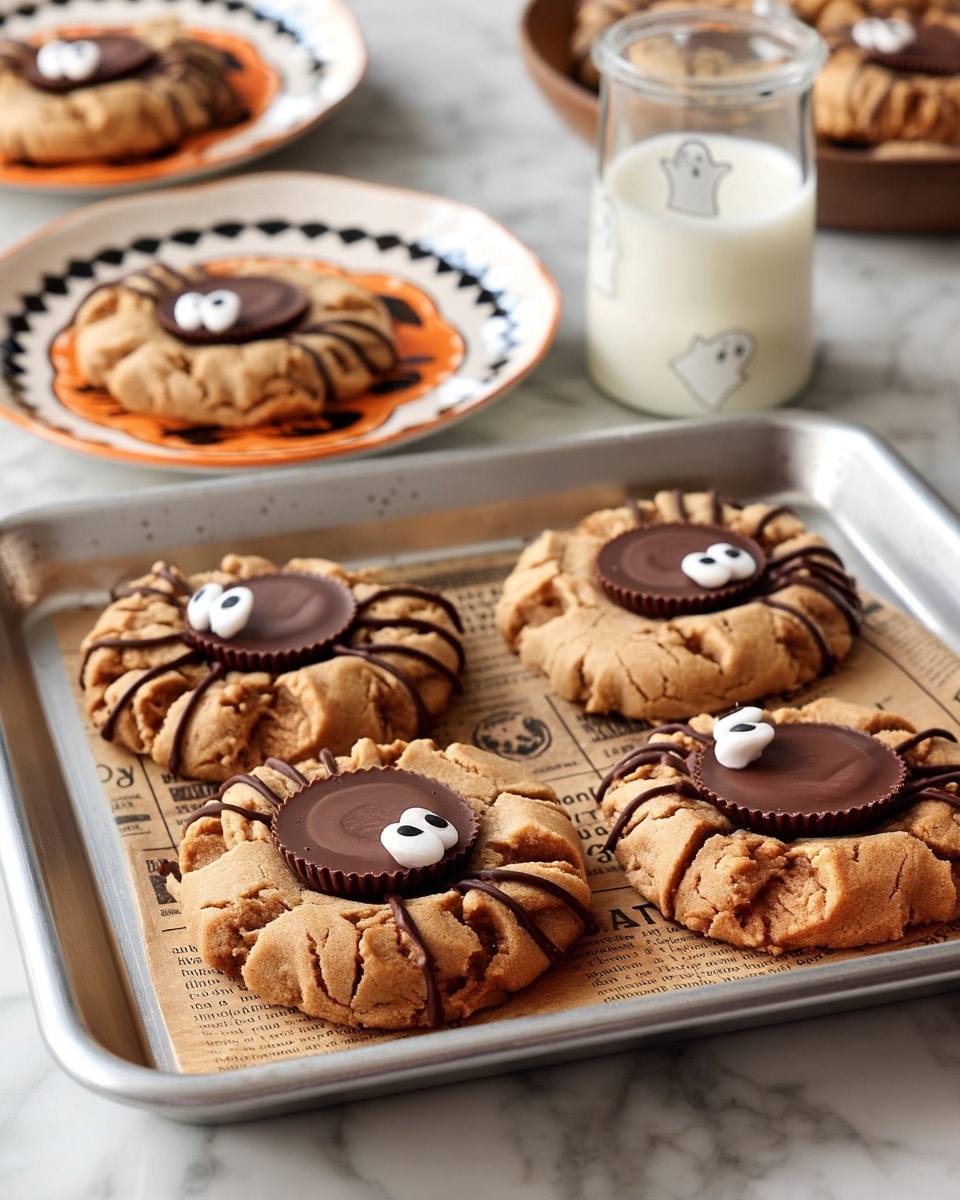
When I serve these Peanut Butter Cup Spider Cookies, I love to present them on a festive platter with a dusting of powdered sugar or a few edible glitter sprinkles to bring out the playful spider design. They’re best enjoyed at room temperature, which allows the peanut butter cups to be gooey but not melted, and the cookie to remain soft and chewy. For a cozy afternoon treat, I like pairing them with a glass of cold milk or a hot cup of coffee, which balances the richness beautifully.
If you’re aiming to impress guests at a party, try serving them alongside other seasonal treats like pumpkin spice latte cookies or salted caramel popcorn. For a whimsical twist, I sometimes add small bowls of raspberry or strawberry jam to dip the cookies for a pop of tangy sweetness. These cookies also make a fun addition to holiday dessert tables or children’s birthday parties, where the spider motif always gets a giggle or two—and if you’re serving kids, a side of fruit juice or hot chocolate makes a perfect pairing.
For a more sophisticated tasting experience, I occasionally serve these cookies with a lightly chilled dessert wine, such as a late harvest Riesling or a fruity port, which complements the peanut butter and chocolate flavors in an unexpected but delightful way. No matter the occasion, these cookies are always a crowd-pleaser and add a touch of festive fun to any gathering.
Variations
I’m always tempted to experiment with this Peanut Butter Cup Spider Cookies Recipe because it’s so flexible. For example, if you want a gluten-free version, simply swap the all-purpose flour with a 1:1 gluten-free baking flour blend. The texture stays wonderful, and the flavor remains rich and satisfying. Vegan friends can still enjoy these by using a vegan butter substitute, a flax egg, and dairy-free peanut butter cups. I tested this myself and was pleasantly surprised at how similar in taste and texture the vegan version turned out.
To change up the flavor profile, I sometimes replace the milk chocolate with dark chocolate for the spider legs, which adds a nice bitterness that balances the sweetness. You could also mix in chopped roasted peanuts or swirl in a bit of honey for added crunch or sweetness. For a different appearance that’s just as fun, try substituting the peanut butter cups with small caramel-filled chocolates or even mini marshmallows for a softer center.
Cooking-wise, I’ve experimented by baking the cookies a couple of minutes longer for a firmer bite, or by slightly underbaking if I want them extra soft. Another idea is to skip the chilling step for a quicker turnaround, but the cookies do spread a bit more and lose some of their chewiness, so I don’t recommend that unless you’re in a big rush.
Storage and Reheating
Storing Leftovers
After enjoying these Peanut Butter Cup Spider Cookies, I store any leftovers in an airtight container at room temperature. They stay soft and delicious for up to 4 days, which is perfect if you want to savor them over several days without refrigeration dulling their flavor.
Freezing
These cookies freeze very well! I recommend placing the cooled cookies in a single layer on a baking sheet first, freezing until firm, and then transferring them to a zip-top freezer bag or airtight container. They keep deliciously for up to 3 months. When you’re ready to enjoy, simply thaw at room temperature for a few hours. I avoid freezing the peanut butter cups separately since they can become crumbly or alter the cookie’s texture if thawed incorrectly.
Reheating
To bring back that fresh-from-the-oven warmth, I gently warm the cookies in a microwave for 10-15 seconds or in a low oven at 300°F for about 5 minutes. This softens the cookie and melts the chocolate and peanut butter cup just a bit, making each bite irresistible. Be cautious not to overheat, or the treats can become too soft or dry out.
FAQs
Can I use natural peanut butter in this recipe?
Yes, you can substitute natural peanut butter, but keep in mind it has a higher oil content and less sugar, which might affect the dough’s texture and sweetness. You may want to slightly reduce the added sugar or chill the dough longer to prevent spreading.
What’s the best way to prevent the cookies from spreading too much?
Chilling the shaped cookies for 30 minutes before baking is crucial. It firms up the dough and helps maintain the cookie shape, giving you that perfect indentation for the peanut butter cups.
Can I make these cookies ahead of time for a party?
Absolutely! You can prepare the cookie dough and shape the cookies ahead of time and refrigerate them for up to 24 hours before baking. Alternatively, bake and cool the cookies, then add the peanut butter cups and decorate with chocolate legs just before serving for maximum freshness.
Is it okay to use other chocolate besides milk chocolate?
Definitely! Dark chocolate or semi-sweet chocolate work wonderfully and add a nice contrast to the peanut butter. White chocolate is another tasty alternative if you want to switch up the look and flavor.
What if I don’t have vanilla bean paste?
No worries—regular vanilla extract works just fine. I use vanilla bean paste when I want a subtle speckled look and a richer vanilla flavor, but either will make your cookies delicious.
Conclusion
Making my Peanut Butter Cup Spider Cookies Recipe is such a joyful experience, from mixing the dough to adding those charming chocolate spider legs. I hope you’ll try it out and delight in the chewy peanut butter goodness combined with the gooey center that makes these cookies so irresistible. Whether you’re baking for a special occasion or just because, these cookies are sure to bring smiles and satisfy any sweet tooth!
Print
Peanut Butter Cup Spider Cookies Recipe
- Prep Time: 20 minutes
- Cook Time: 15-20 minutes
- Total Time: 55 minutes
- Yield: 8 cookies
- Category: Dessert
- Method: Baking
- Cuisine: American
Description
Peanut Butter Cup Spider Cookies are a fun and festive treat perfect for Halloween or any occasion where you want a playful dessert. These soft and chewy peanut butter cookies are stacked, indented, and topped with a full-size peanut butter cup surrounded by piped melted chocolate spider legs, making them as delightful to look at as they are to eat.
Ingredients
Cookie Dough
- ½ cup butter (1 stick, room temperature)
- ¾ cup granulated sugar
- ¼ cup packed brown sugar
- 1 cup creamy peanut butter
- 1 large egg
- 1 ½ teaspoons vanilla bean paste or extract
- 1 ½ cups all-purpose flour, spooned and leveled
- 1 teaspoon baking soda
- ½ teaspoon baking powder
- ¼ teaspoon kosher salt
Decoration
- ¼ cup milk chocolate, melted (for spider legs)
- 8 full-size peanut butter cups
Instructions
- Prepare Baking Sheets: Line a baking sheet with parchment paper to prevent sticking and ensure even baking.
- Cream Butter and Sugars: In a large bowl, beat together the butter, granulated sugar, and brown sugar until the mixture is light and fluffy, which will help create a soft texture.
- Mix Wet Ingredients: Add the creamy peanut butter, egg, and vanilla bean paste to the creamed mixture and mix until fully combined.
- Combine Dry Ingredients: In a separate bowl, whisk together the flour, baking soda, baking powder, and kosher salt.
- Incorporate Dry into Wet: Gradually add the dry ingredients to the wet mixture, mixing gently just until combined to avoid overworking the dough.
- Form Double-Stuffed Dough Balls: Scoop two ice cream scoop-sized balls of dough and stack them on top of each other. Use the back of the ice cream scoop to press an indentation into each stacked cookie, creating a well for the peanut butter cup.
- Chill the Dough: Refrigerate the baking sheets with the prepared dough balls for 30 minutes to firm them up for better shape retention during baking.
- Bake Cookies: Preheat your oven to 350°F (175°C). Bake cookies for 15-20 minutes or until the edges turn lightly golden. Once baked, let cookies cool on the sheet for one minute.
- Create Cookie Indentation: Using a ½ cup measuring cup, gently press down the center of each cookie again to deepen the well while still warm, then allow cookies to cool for another 5 minutes.
- Prepare Chocolate for Decoration: Melt the milk chocolate in the microwave in 20-second intervals, stirring in between until smooth and fully melted.
- Assemble Cookies: Place one full-size peanut butter cup into the indentation of each cooled cookie. Using melted chocolate, pipe 8 spider legs around the peanut butter cup to complete the spider design.
- Optional Enhancement: For added flavor, spread a thin layer of raspberry or strawberry jam in the indentation before placing the peanut butter cup.
Notes
- Pressing the cookie centers both before and after baking helps maintain shape and better holds the peanut butter cup.
- Chilling the dough before baking is essential to prevent spreading and to keep the stacked shape intact.
- You can substitute vanilla bean paste with pure vanilla extract if unavailable.
- To make the spider legs neater, use a piping bag with a small round tip or a plastic bag with a tiny hole cut at the corner.
- Store cookies in an airtight container at room temperature for up to 3 days or refrigerate for longer freshness.


