
I absolutely adore sharing this Nutter Butter Ghost Cookies Recipe with you because it’s such a delightful, playful treat that never fails to bring a smile. These no-bake cookies are dipped in creamy white candy melts and then given cute little eyes and mouths, making them perfect for Halloween or any festive occasion where you want a quick, fun dessert. I love how simple it is to make yet how impressive the final result looks. The sweetness of the candy coating balances perfectly with the peanut buttery cookie, creating a flavor combo that’s downright addictive.
Why You’ll Love This Nutter Butter Ghost Cookies Recipe
I find this recipe incredibly special because it hits that perfect balance of being super easy while still making a big impression. The flavor is spot on; the white candy melts are sweet and creamy, enhancing the peanut butter flavor of the Nutter Butter cookies without overpowering them. Each bite feels light and fun, making it hard not to reach for more. It’s one of those snacks that’s just as great for kids as adults, which is a huge win in my book.
One of the reasons I keep coming back to this Nutter Butter Ghost Cookies Recipe is how effortless it is to prepare. You don’t need to bake, which means the prep and cleanup are both minimal. Plus, decorating the cookies with candy eyes and chocolate chip mouths brings out your inner artist and adds a playful touch. These cookies always shine at Halloween parties, family gatherings, or even as a sweet surprise for the kids after school. It’s a recipe that stands out because it’s festive, fun, and incredibly tasty without any fuss.
Ingredients You’ll Need
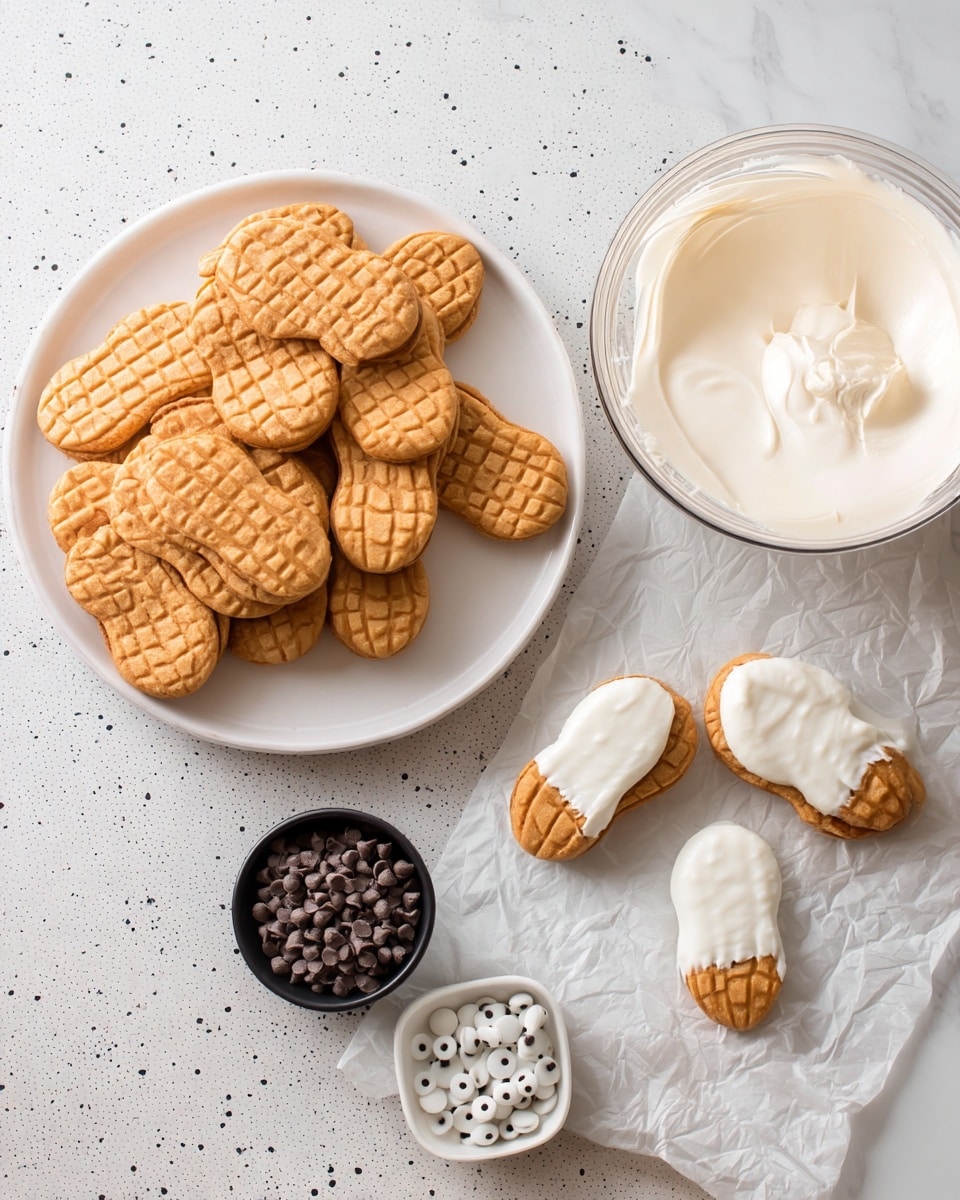
The ingredients for this treat are simple but essential. Each one plays a critical role in creating the perfect texture, flavor, and look of these ghostly delights.
- 12 ounces white candy melts: These provide the smooth, creamy coating that turns each cookie into a spooky white ghost.
- 18 Nutter Butter cookies: The peanut buttery cookies serve as the perfect base, offering a delicious crunch and rich flavor.
- 32 candy eyes: Essential for giving your ghosts their personality—make sure to add them before the coating sets!
- 18 mini chocolate chips: Used for the mouth, these add a classic chocolatey touch to complete each ghost face.
Directions
Step 1: Place the white candy melts in a microwave-safe bowl. Heat them in 30-second increments, stirring well after each interval until fully melted and smooth. This method helps avoid burning and ensures a silky coating.
Step 2: Dip each Nutter Butter cookie about three-quarters of the way into the melted candy. Hold it over the bowl to let the excess drip off so you don’t end up with too thick a coating. Then place the dipped cookies on a sheet of parchment or wax paper.
Step 3: Working quickly in small batches of 3 to 4 cookies, press two candy eyes and a mini chocolate chip onto the still-wet candy coating to create the spooky ghost faces. Timing is key here because you want these features to stick before the coating hardens.
Step 4: Let the cookies sit undisturbed until the candy coating is fully set. This usually takes about 30 minutes, but you can speed things up by placing them in the refrigerator for a few minutes. Once set, they’re ready to enjoy!
Servings and Timing
This recipe yields about 18 adorable ghost cookies, which is perfect for sharing at parties or handing out as festive treats. Prep time is roughly 15 minutes, and since there’s no baking involved, your cook time is mainly the melting and decorating. The candy coating needs about 30 minutes to chill and set, making your total time approximately 45 minutes. It’s great because the hands-on time is short, letting you multitask or prepare other Halloween goodies while the cookies chill.
How to Serve This Nutter Butter Ghost Cookies Recipe
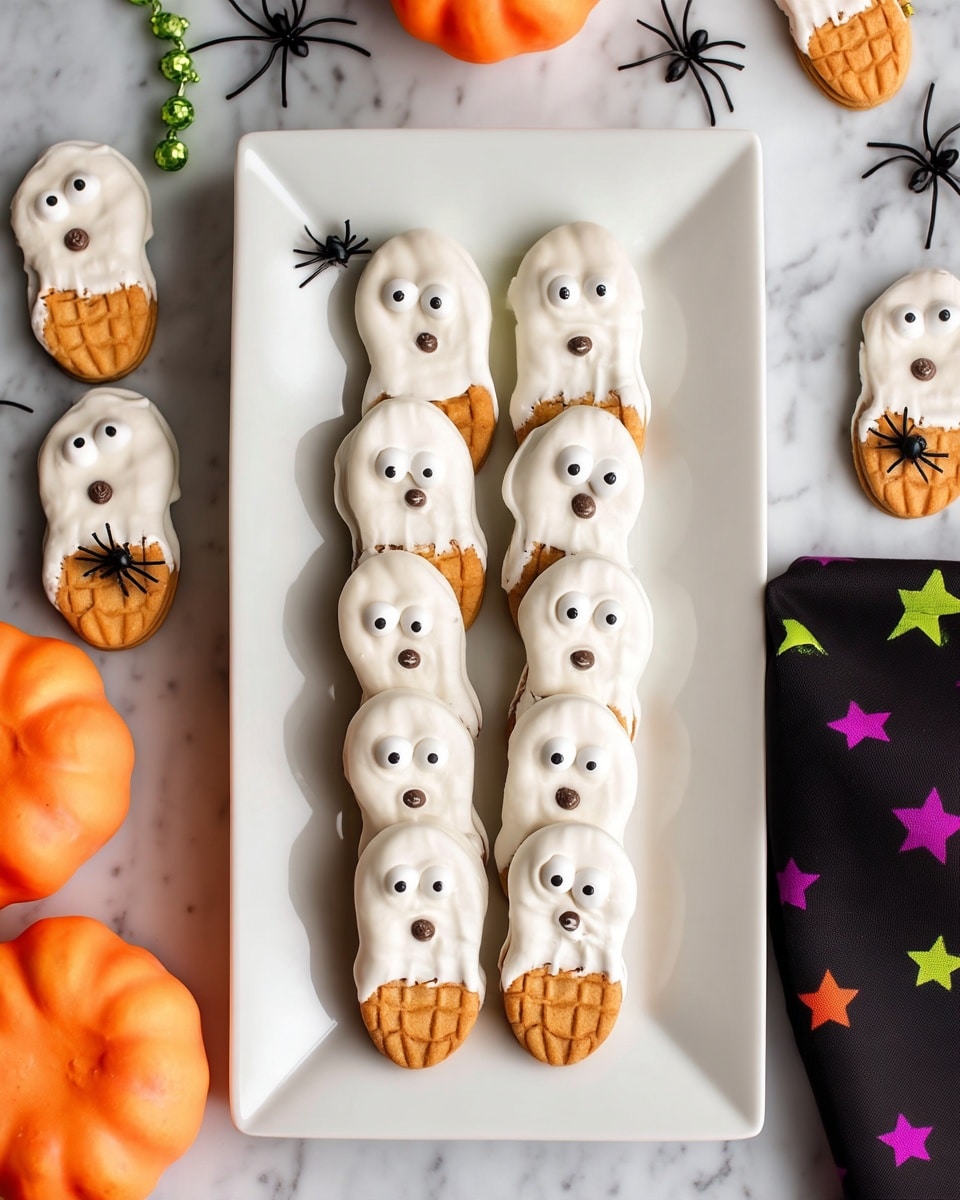
When I serve these Nutter Butter Ghost Cookies Recipe treats, I love to place them on a festive platter lined with parchment paper decorated with Halloween motifs—think tiny pumpkins or spider web doilies. They look just as cute displayed standing upright or casually stacked in little piles. I find that serving them at room temperature is ideal because the candy coating is perfectly firm but not too hard, letting the peanut butter cookie texture shine through.
These cookies pair amazingly well with cold milk or even a creamy hot chocolate if you want to create a cozy vibe. For an adult twist, I’ve served them alongside a spiced pumpkin cocktail or a light, fruity white wine, which surprisingly complements the sweetness. They’re wonderful for Halloween parties, kids’ school events, or anytime you want a no-fuss dessert that packs a fun visual punch. Plus, they make great treats to package up as festive gifts!
For garnishing, I like to sprinkle a tiny pinch of edible glitter on the white candy coating before it sets, adding a magical shimmer that the kids absolutely adore. If you want to add an extra layer, you could drizzle a little dark chocolate over the ghosts after they’ve set for a contrast in color and flavor—totally optional but so charming.
Variations
I love experimenting with this Nutter Butter Ghost Cookies Recipe by switching up ingredients to suit different preferences or dietary needs. If peanut allergies are a concern, you can swap out the Nutter Butter cookies for a simple vanilla or sugar cookie base, which still works beautifully with the white candy melts. For a gluten-free option, look for gluten-free peanut butter cookies or your favorite gluten-free base cookies.
If you want to dial up the spooky factor, try tinting your candy melts with a tiny bit of orange or purple food coloring before dipping—this gives a festive twist that still lets you add the candy eyes and mouths. I’ve also played around with adding a drop of mint extract to the melted candy for a refreshing aftertaste that contrasts nicely with the peanut butter. For a vegan variation, there are vegan white chocolate alternatives that melt just as well and keep the recipe plant-based.
While I tend to stick to dipping, you could try drizzling the candy melts over the cookies for a different texture and look. Or you can even sandwich two cookies together with a bit of softened frosting before dipping for a thicker, creamier treat. The possibilities are fun to explore and customize for your gatherings.
Storage and Reheating
Storing Leftovers
To keep your Nutter Butter Ghost Cookies fresh, store them in an airtight container at room temperature. I recommend layering the cookies with parchment paper in between if you need to stack them, so the candy coating doesn’t stick together. They’ll stay fresh and tasty for about 3 to 4 days, perfect for snacking throughout the week.
Freezing
If you want to make these ahead of time, you can freeze the cookies! Place them in a single layer on a baking sheet, freeze until solid, then transfer to a freezer-safe bag or container. When stored this way, they keep well for up to 2 months. Just be sure the candy coating is fully set before freezing to prevent smudging or sticking.
Reheating
Since these are best enjoyed at room temperature with firm candy coating, I don’t recommend reheating. If they’ve chilled in the fridge or freezer, simply let them sit at room temperature for about 15 minutes before serving—this will soften the candy slightly and bring out the flavors without losing that fun texture. Avoid microwaving as it can melt the coating unevenly and ruin the appearance.
FAQs
Can I use chocolate chips instead of candy melts?
You can use white chocolate chips as a substitute for candy melts, but they tend to melt unevenly and might require a bit of vegetable oil or shortening to get the right dipping consistency. Candy melts are formulated to melt smoothly without seizing, so they’re my personal favorite for this recipe.
What if I don’t have candy eyes? What can I use instead?
If you don’t have candy eyes, you can get creative! Mini chocolate chips, small dots of melted chocolate piped on with a toothpick, or tiny icing dots can all serve as eyes. The key is to add them before the coating sets so they stick well.
How do I prevent the candy coating from melting off the cookies?
Make sure the candy melts are fully set before handling or storing the cookies. Also, dipping just about three-quarters of each cookie and letting the excess drip off helps the coating adhere better without becoming too thick and prone to sliding off.
Can I make these cookies ahead of time?
Absolutely! These cookies are great to prepare a day or two ahead. Just store them properly in an airtight container at room temperature, and your ghosts will keep their shape and flavor perfectly well.
Are these cookies suitable for kids with allergies?
Since the base is Nutter Butter cookies, which contain peanut butter, this recipe is not safe for those with peanut allergies. However, you can substitute with allergy-friendly cookies and still follow the same decoration process for a similar festive treat.
Conclusion
I can’t recommend this Nutter Butter Ghost Cookies Recipe enough if you’re looking for a festive, easy, and delicious treat that’s guaranteed to impress. The combination of creamy white candy coating with that classic peanut butter cookie flavor is pure magic, and the fun ghost faces make it a total crowd-pleaser. Give this recipe a try—you’ll love how quickly you can whip these up and how much joy they bring to your celebrations!
Print
Nutter Butter Ghost Cookies Recipe
- Prep Time: 15 minutes
- Cook Time: 0 minutes
- Total Time: 45 minutes
- Yield: 18 cookies
- Category: Desserts & Sweets, Snacks
- Method: No-Cook
- Cuisine: American
Description
These easy Nutter Butter Ghost Cookies are a fun, no-bake Halloween treat made by dipping classic Nutter Butter cookies in melted white candy and decorating them with candy eyes and mini chocolate chip mouths. Perfect for spooky parties and festive snacking.
Ingredients
For the Cookies
- 18 Nutter Butter cookies
For the Coating
- 12 ounces white candy melts
For Decoration
- 32 candy eyes
- 18 mini chocolate chips
Instructions
- Melt the Candy: Place the white candy melts in a microwave-safe bowl. Heat in 30-second increments, stirring between each, until the candy melts are fully melted and smooth.
- Dip the Cookies: Dip about three-quarters of each Nutter Butter cookie into the melted white candy. Hold the cookie over the bowl to allow excess candy to drip off. Place the dipped cookies on parchment paper or wax paper to set.
- Add the Faces: While the candy coating is still wet, working in small batches, place two candy eyes on each cookie and use a mini chocolate chip to create a mouth. This step must be done before the coating sets to ensure they stick.
- Let Set: Allow the coated cookies to sit undisturbed at room temperature for about 30 minutes until the candy coating hardens and sets completely.
- Serve and Enjoy: Once set, your spooky Nutter Butter Ghost Cookies are ready to be served and enjoyed as a delightful Halloween treat.
Notes
- Be sure to add the candy eyes and chocolate chip mouth before the candy coating fully sets for proper adhesion.
- Use parchment or wax paper to prevent sticking during setting.
- If the candy melts begin to thicken while dipping, reheat briefly in the microwave to maintain a smooth texture.
- Store the finished cookies in an airtight container at room temperature for up to 2 days for best freshness.


