
I absolutely adore making festive treats that are as fun to prepare as they are to eat, and this Mummy Cake Pops Recipe is one of my all-time favorites! These spooky little delights combine crumbly Oreo cookie crumbs with creamy cheese and silky white chocolate, coming together in the cutest mummy shapes you can imagine. They’re perfect for Halloween parties or anytime you want to add a playful touch to your dessert lineup. I love that they’re bite-sized, super rich, and so straightforward to put together – it feels like magic turning simple ingredients into such an eye-catching, delicious snack.
Why You’ll Love This Mummy Cake Pops Recipe
What makes this Mummy Cake Pops Recipe stand out to me is the perfect balance of flavors and textures. The slightly crunchy Oreo cookie crumbs blended with smooth cream cheese create a rich and creamy center, while the white chocolate coating adds a luscious sweetness and that satisfying snap when you bite in. The little eyeball sprinkles bring a bit of whimsy and fun, making these cake pops truly irresistible, especially for kids and party guests! I always find myself grabbing one or two longer than I should because the flavor combination is just that good.
Another thing I can’t stop raving about is how unbelievably easy these cake pops are to make. You don’t have to bake a thing, which means less mess and less time in the kitchen. I love on busy days or for last-minute gatherings that I can whip these up in under 30 minutes. Plus, the chilling steps are super hands-off, giving me time to prep drinks or decorate the rest of the table. These cake pops really shine at Halloween parties, school events, or any time you want a sweet treat with a fun, spooky flair. Trust me, your guests will be impressed by how adorable and delicious your Mummy Cake Pops look!
Ingredients You’ll Need
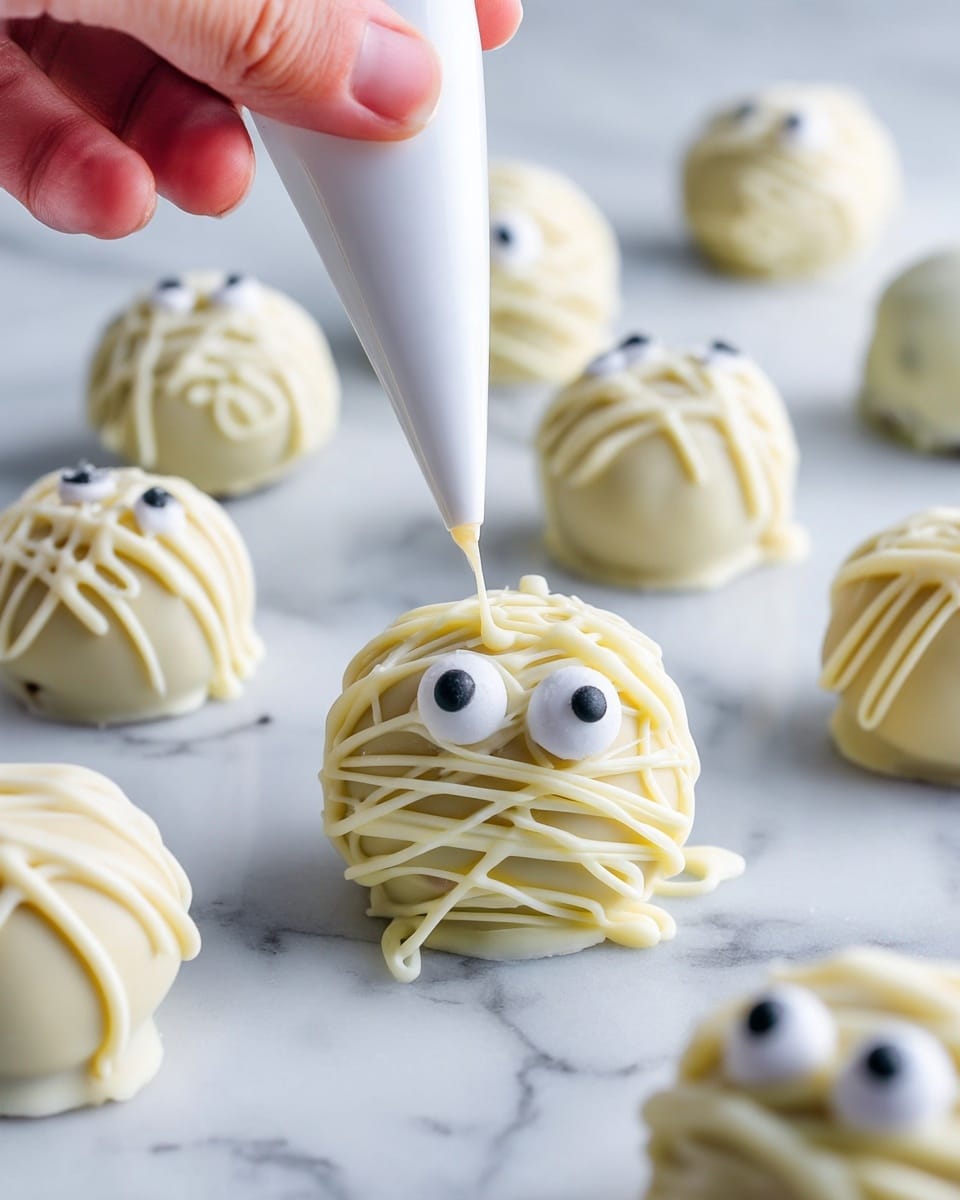
The ingredients for this recipe are delightfully simple but essential to creating the perfect taste, texture, and look. Each one plays a key role: the Oreos for that iconic cookie flavor, the cream cheese for creamy binding, and the white chocolate to beautifully coat the pops with a smooth finish that brings the mummies to life.
- 36 classic Oreo cookies: Use whole Oreos, centers and all, for that authentic chocolate-cookie crunch that forms the base of the cake pop.
- 1 cup (8 oz) full-fat cream cheese, room temperature: This adds richness and helps bind the cookie crumbs into a pliable dough.
- 3 cups good-quality white chocolate chips or chopped white chocolate: For coating and decorating, go for high-quality to ensure a smooth, glossy finish.
- 2 tsp vegetable or canola oil: Helps thin the white chocolate for easier dipping and drizzling.
- 60 small eyeball sprinkles: These give the mummy cake pops their fun, spooky character.
- Large, flat plate and parchment paper: To lay out the pops as they chill and dry without sticking.
- Food processor: For crushing the Oreos finely and mixing the dough evenly.
- 1 Tbsp cookie scoop: Makes uniform sized balls for pretty, consistent pops.
- 2 forks: Essential tools for dipping and transferring the cake pops.
- Small piping bag or Ziplock bag: For drizzling extra white chocolate to create mummy “bandages.”
Directions
Step 1: Line a large flat plate with parchment paper and set aside to keep your cake pops from sticking later on.
Step 2: Place all 36 Oreo cookies into your food processor. Pulse them until you have fine, uniform crumbs. If you don’t have a food processor, no worries—just put the Oreos in a ziplock bag and crush them gently with a rolling pin until finely ground.
Step 3: Add the full cup of room temperature cream cheese to the cookie crumbs in the food processor. Pulse again until it forms a wet, dough-like mixture. If it seems too stiff, cutting the cream cheese into smaller pieces before pulsing helps it mix evenly.
Step 4: Remove the blade carefully and scrape the mixture off with a rubber spatula. Using your cookie scoop or a tablespoon, scoop out about 30 individual balls onto your parchment-lined plate. I like the sizes to be similar for neater, more uniform pops, but a little variation is totally fine. Pop the plate into the freezer for 30 minutes to firm up the balls.
Step 5: While the Oreo balls chill, melt 2 cups of your white chocolate chips in a short, wide, microwave-safe glass. Heat in 15-second intervals, stirring between each, until smooth. Stir in the 2 teaspoons of vegetable or canola oil to thin the chocolate slightly – this will make dipping much easier.
Step 6: Remove half of the chilled Oreo balls from the freezer to dip first. Submerse one Oreo ball into the melted white chocolate, pressing gently to coat fully. Lift it out with one fork, tapping gently against the glass rim to let excess chocolate drip off.
Step 7: Using a second fork, slide the coated Oreo ball back onto the parchment paper. While the chocolate is still wet, carefully press two eyeball sprinkles onto the top to create the mummy’s spooky eyes. Repeat this dipping and decorating process with the rest of the balls in batches. Don’t worry if the chocolate gets “dirty” with cookie bits as you go – it adds to the mummy’s aged look and will mostly be covered up later.
Step 8: Put the remaining cup of white chocolate chips into a small piping or Ziplock bag. Heat in the microwave in 15-second bursts, gently massaging the bag between intervals until mostly melted. Once ready, cut a tiny 1/4-inch hole at the bag’s tip and drizzle the white chocolate over each mummy pop to create “bandage” lines.
Step 9: Let the pops sit at room temperature for a few minutes to begin setting, then place them in the refrigerator for at least 15 minutes. This helps the white chocolate harden fully. Afterward, transfer the pops to an airtight container for storage. If you’re making them in advance, they’ll keep beautifully in the fridge for up to a week.
Servings and Timing
This recipe makes about 30 mummy cake pops, perfect for sharing at a party or gifting to friends and family. The prep time is roughly 20 minutes, mostly hands-on, with an additional 30 minutes of chilling to set the dough balls before dipping. The chocolate melting and decorating add another 15 to 20 minutes. Overall, from start to finish, you’re looking at about 1 hour, including freezing and cooling times. These timing estimates work great for planning your party prep or holiday baking session!
How to Serve This Mummy Cake Pops Recipe
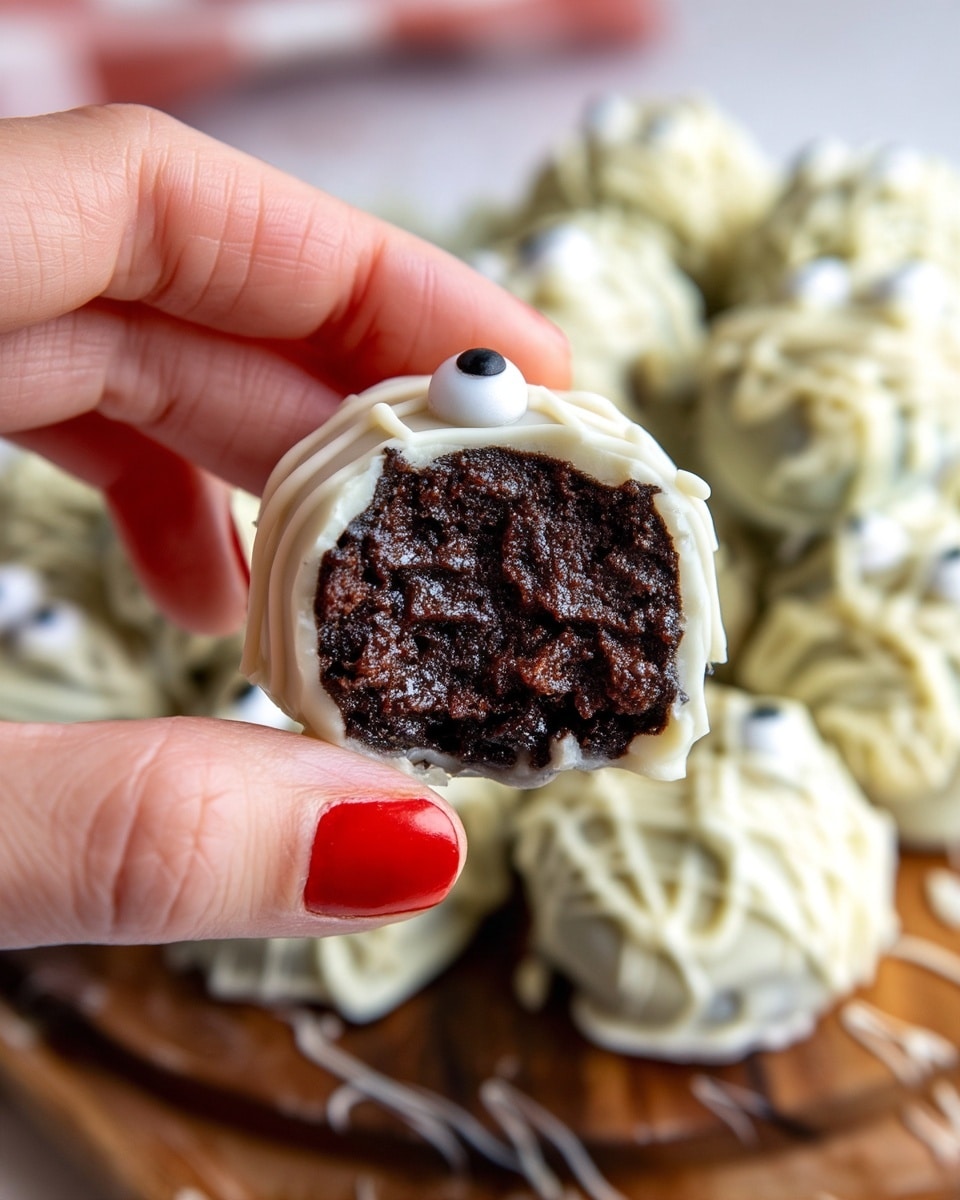
I love to serve these Mummy Cake Pops as charming party snacks or after-dinner treats. They look fantastic when arranged on a festive platter lined with black or orange napkins, perfect for a Halloween spread! For an extra special touch, you could place them in a decorative vase or jar filled with candy corn or shredded paper. Their bite-sized nature makes them easy for guests to grab and enjoy, whether mingling at a party or sitting down at a kid’s birthday celebration.
For accompaniments, I often pair these cake pops with simple, complementary flavors like fresh fruit or a creamy dip for contrast. They also go wonderfully with pumpkin spice lattes, hot cocoa, or even a crisp apple cider if you want to lean into the autumn vibe. For adult gatherings, try pairing them with a chilled glass of vanilla-infused white wine or a light citrusy cocktail to balance out the sweetness.
Because of the cream cheese in the center, I recommend serving these mummy cake pops at room temperature or slightly chilled. This lets the white chocolate coating stay firm while the inside remains luscious and delightfully creamy. If you plan to plate them up for a crowd, space them evenly so they stand out visually, and offer about one to two pops per person as a perfect portion size. Sharing these with loved ones always feels like spreading a little festive joy!
Variations
One of the things I enjoy most about this Mummy Cake Pops Recipe is how adaptable it is. For example, if you want a gluten-free option, you can swap the Oreos for gluten-free chocolate sandwich cookies—just be sure they’re finely crushed the same way. If dairy is a concern, vegan cream cheese alternatives work surprisingly well, and you can find dairy-free white chocolate chips to keep it plant-based while still achieving that smooth coating.
If you’re craving a different flavor profile, try mixing in a pinch of cinnamon or pumpkin pie spice into the Oreo-cream cheese dough for a seasonal twist. You could also swap the white chocolate for milk or dark chocolate if you prefer a richer, less sweet coating. Using colored candy melts instead of white chocolate could add an extra pop of color and personalization, especially if you’re making these for different parties or themes.
For a fun, hands-on activity, consider letting kids help with the decorating step, using mini chocolate chips or candy eyes instead of the eyeball sprinkles. While these pops don’t need baking, I’ve even experimented with quickly chilling the balls in the freezer before dipping to give them a bit more firmness while coating, which can be helpful if your kitchen is warm. However you customize them, these mummy cake pops always turn out as a crowd-pleaser!
Storage and Reheating
Storing Leftovers
If you have any leftovers after the party (which I hope you do!), store them in an airtight container in the refrigerator. I recommend layering them gently between sheets of parchment paper to prevent sticking or damage to the white chocolate coating. These mummy cake pops will stay fresh and delicious for up to one week when properly stored, making them a great make-ahead treat for busy days.
Freezing
These cake pops freeze well, which is a lifesaver for prepping in advance. To freeze them, place pops on a parchment-lined tray in a single layer and freeze until solid (about an hour). Then transfer them to a freezer-safe airtight container or ziplock bag, separating layers with parchment. Frozen mummy pops will keep well for up to 2 months. When you’re ready to enjoy them, thaw in the refrigerator overnight rather than at room temperature to keep the creamy center intact.
Reheating
Reheating mummy cake pops is really about bringing them to the right serving temperature rather than warming them up like a baked good. I find the best method is simply to take them out of the fridge about 15 minutes before serving so they come to room temperature naturally. Avoid microwaving because the cream cheese center can warm unevenly and the chocolate shell may melt or become grainy. This way, the pops maintain their perfect texture and delightful taste!
FAQs
Can I use a different cookie instead of Oreos for this Mummy Cake Pops Recipe?
Absolutely! While Oreos provide the classic chocolate and cream flavor, you can substitute any sandwich cookies you like. Just make sure they’re finely crushed and still have some cream filling for binding. Chocolate sandwich cookies work best for the authentic taste and texture, but feel free to experiment with flavors like mint or cinnamon for a twist.
What type of cream cheese works best for this recipe?
I recommend using full-fat cream cheese at room temperature for the creamiest consistency and the best flavor. Low-fat or reduced-fat versions may alter the texture slightly, resulting in less smooth dough. Room temperature cream cheese blends more easily with the cookie crumbs, making the dough easier to handle and scoop.
Can I prepare these mummy cake pops ahead of time?
Yes, and I highly encourage it! These cake pops are perfect to make a day or two before your event. After dipping and decorating, keep them refrigerated in an airtight container. Just bring them out about 15 minutes before serving so they’re not too cold and the flavors shine through.
Is it necessary to add oil to the white chocolate?
Add the vegetable or canola oil to thin the melted white chocolate, which makes it much easier to coat the Oreo balls smoothly. Without the oil, white chocolate can be quite thick and tricky to dip evenly, so this small step really helps achieve that silky, flawless finishing coat.
What should I do if my white chocolate starts to get too thick while dipping?
If your white chocolate cools and thickens during the dipping process, simply warm it gently in the microwave for short intervals, stirring well each time. Adding a tiny bit more oil can also help maintain a smooth consistency. Just be careful not to overheat or burn the chocolate, as this can ruin the texture and flavor.
Conclusion
I can’t recommend this Mummy Cake Pops Recipe enough if you’re looking to add a touch of spooky fun to your dessert table with minimal fuss. These little treats are not only adorable but also rich, creamy, and perfectly sweetened to delight guests of all ages. Whether you’re hosting a Halloween party, preparing a festive school snack, or just craving an easy, show-stopping sweet, these cake pops deliver every time. I hope you have as much fun making and sharing them as I do!
Print
Mummy Cake Pops Recipe
- Prep Time: 10 minutes
- Cook Time: 10 minutes
- Total Time: 20 minutes
- Yield: 30 cake pops
- Category: Dessert
- Method: No-Cook
- Cuisine: American
Description
These Mummy Cake Pops combine the classic flavor of Oreo cookies with creamy full-fat cream cheese, all dipped in rich white chocolate for a spooky Halloween treat. Perfectly sized and decorated with eyeball sprinkles, these no-bake cake pops are fun to make and great for parties or festive celebrations.
Ingredients
For the Cake Pops
- 36 classic Oreo cookies – centers and all (400g)
- 1 cup (8 oz) full-fat cream cheese, room temperature (226g)
For the Coating and Decoration
- 3 cups good-quality white chocolate chips or chopped white chocolate (525g), divided
- 2 tsp vegetable or canola oil (12g)
- 60 small eyeball sprinkles
Instructions
- Prepare the Surface: Line a large, flat plate with parchment paper and set it aside to place the cake pops later.
- Crush the Oreos: Place the 36 Oreo cookies in a food processor and pulse until they become fine, uniform crumbs. If you don’t have a food processor, crush the Oreos inside a ziplock bag with a rolling pin.
- Mix with Cream Cheese: Add 1 cup of full-fat cream cheese to the Oreo crumbs in the food processor. Pulse again until the mixture is fully combined and looks like wet dough. If needed, cut the cream cheese into smaller pieces for easier mixing.
- Scoop and Chill: Remove the blade attachment and scrape down the bowl with a spatula. Use a 1 tablespoon cookie scoop or similar spoon to form about 30 uniform balls and place them onto the prepared parchment-lined plate. Freeze for 30 minutes to chill and firm up.
- Melt White Chocolate: Melt 2 cups (350g) of white chocolate chips in a short, wide, heatproof glass. Heat in 15-second intervals, stirring between, until smooth. Stir in 2 teaspoons of vegetable or canola oil to thin the chocolate for easier coating.
- Coat the Cake Pops: Take half of the chilled Oreo balls from the freezer to prevent them from softening. Dip each ball into the melted white chocolate, pressing gently to coat fully. Lift with a fork, tapping to remove excess chocolate, then place back onto the parchment-lined plate.
- Decorate with Eyes: While the chocolate is still wet, press two eyeball sprinkles on top of each coated ball. Repeat the dipping and decorating with the remaining Oreo balls. Note that the coating will get a bit ‘dirty’ with crumbs, creating an aged mummy effect.
- Drizzle White Chocolate: Melt the remaining 1 cup of white chocolate chips in a small piping or ziplock bag in 15-second bursts until mostly melted. Massage the bag to smooth out any lumps. Cut a small opening (about 1/4 inch) at the tip and drizzle over each cake pop to create mummy bandage lines.
- Set and Store: Let the cake pops sit at room temperature for a few hours if serving immediately. Then place them in the fridge for about 15 minutes before transferring to an airtight container to fully set the chocolate. Store refrigerated for up to one week.
Notes
- Use a short, thick glass to melt chocolate for better heat retention and easier dipping.
- Freezing the cake pops in batches helps maintain their firmness during coating.
- The ‘dirty’ white chocolate coating with crumbs adds to the authentic mummy look.
- Store cake pops in an airtight container in the refrigerator due to the cream cheese in the mixture.
- These cake pops do not require baking and are perfect for a quick, no-cook festive dessert.


