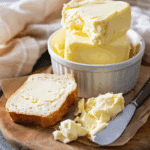
I love how simple and satisfying homemade butter is—it’s just heavy cream whipped until it separates, creating fresh butter and buttermilk in one go.

Why You’ll Love This Recipe
I enjoy making homemade butter because it’s incredibly easy, only takes a few minutes of active time, and delivers a rich, fresh flavor that store-bought butter can’t match. Plus, I get the bonus of homemade buttermilk for baking!
ingredients
Here’s a tip: Check out the full list of ingredients and measurements in the recipe card below.
-
2 cups heavy cream (preferably not ultra-pasteurized)
-
Optional: pinch of salt
directions
-
Pour and Whip
I add the cream to a stand mixer, food processor, or even a large jar with a tight lid if I’m shaking by hand. I whip or shake until it first becomes whipped cream, and then keeps going until the butterfat separates from the buttermilk. -
Drain the Buttermilk
I pour off the liquid and save it for baking—it’s great in pancakes or biscuits. -
Rinse the Butter
I rinse the butter under cold water, then knead it with a spatula or clean hands to squeeze out any remaining buttermilk. I repeat this until the rinse water runs clear. -
Add Salt (Optional)
I knead in a pinch of salt to enhance the flavor. -
Store
I store the butter in an airtight container in the fridge, where it keeps well for up to a week.
Servings and timing
-
Servings: This recipe yields roughly ¾ cup of butter (about 6 ounces) and 1¼ cups of buttermilk.
-
Active prep time: about 10–15 minutes, depending on your whipping method.
-
Total time: around 15–20 minutes.
Variations
-
Herbed butter: I stir in fresh chopped herbs like parsley, chives, or basil after rinsing.
-
Honey butter: I mix in a drizzle of honey for a sweet spread.
-
Garlic butter: I knead in roasted or minced garlic and a bit of fresh parsley for a savory version.
-
Cultured butter: I let the heavy cream sit at room temperature for 12–24 hours before whipping to develop a tangier flavor.
storage/reheating
I store the butter in an airtight container in the fridge, where it stays fresh for up to a week. If I want it softer for spreading, I let it sit at room temperature for 10–15 minutes. For a quicker softening, I microwave it for just 5 seconds on low power.
FAQs
How long does homemade butter last in the fridge?
I find it stays fresh in the fridge for about 7 days. After that, the flavor can start to change.
What can I do with the leftover buttermilk?
I love saving it for baking—it’s great in pancakes, biscuits, muffins, or even homemade soda bread.
Can I use ultra-pasteurized cream?
Yes, you can, but the butter tends to take a bit longer to separate and the flavor might be slightly muted compared to using fresh, not-ultra-pasteurized cream.
Do I need a stand mixer to make this?
Nope! I’ve used a food processor, a hand mixer, and even shaken the cream vigorously in a sealed jar—it all works, though a stand mixer is the fastest and easiest.
Why rinse the butter?
I rinse it to remove remaining buttermilk, which helps the butter last longer and prevents it from tasting sour or spoiling prematurely.
Conclusion
I relish how homemade butter elevates simple meals, whether spread on warm toast, melting over veggies, or enhancing sauces. With just heavy cream and a little effort, I enjoy fresher flavor, control over ingredients, and the bonus of homemade buttermilk for baking. It’s an easy kitchen win that always feels indulgent.
Homemade Butter
- Author: Evelyn
- Prep Time: 10 minutes
- Cook Time: 0 minutes
- Total Time: 15–20 minutes
- Yield: ¾ cup butter and 1¼ cups buttermilk
- Category: Condiment
- Method: Whipping
- Cuisine: American
- Diet: Vegetarian
Description
Homemade butter is a rich and creamy spread made by whipping heavy cream until the butterfat separates from the buttermilk. It’s quick, simple, and yields both butter and buttermilk for use in various recipes.
Ingredients
- 2 cups heavy cream (preferably not ultra-pasteurized)
- Optional: pinch of salt
Instructions
- Pour the heavy cream into a stand mixer, food processor, or a jar with a tight lid. Whip or shake until it first turns to whipped cream and then separates into butterfat and buttermilk.
- Drain the buttermilk and save it for baking or other uses.
- Rinse the butter under cold water and knead it with a spatula or clean hands to remove remaining buttermilk. Repeat until the rinse water is clear.
- Add a pinch of salt if desired and knead to incorporate.
- Store the butter in an airtight container in the fridge for up to a week.
Notes
- Use fresh, not ultra-pasteurized cream for best flavor and quicker results.
- Customize with herbs, garlic, or honey for flavored butters.
- Let the butter sit at room temperature before use for easier spreading.
Nutrition
- Serving Size: 1 tablespoon
- Calories: 102
- Sugar: 0.1g
- Sodium: 1mg
- Fat: 12g
- Saturated Fat: 7g
- Unsaturated Fat: 5g
- Trans Fat: 0g
- Carbohydrates: 0.1g
- Fiber: 0g
- Protein: 0.1g
- Cholesterol: 31mg

