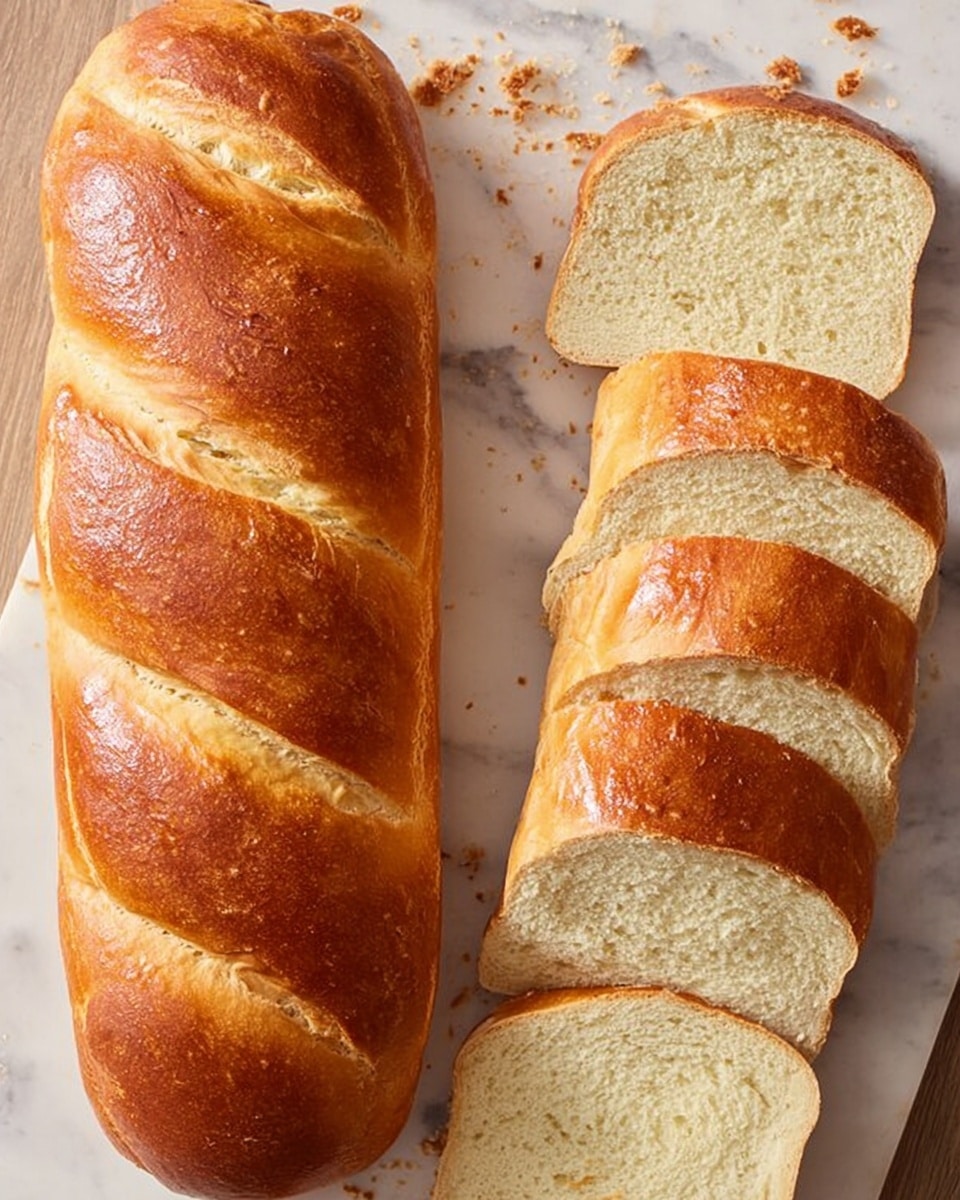
I absolutely love making bread at home, and this Baguette (The Easiest Recipe) Recipe has become one of my favorite go-to recipes when I want that perfect combination of a crispy crust and a soft, airy inside. It’s incredibly satisfying to bake fresh baguettes that smell amazing and taste just like they came from a local French bakery, yet the process is so straightforward that even beginners will feel confident. Every time I make it, the golden loaves fill my kitchen with the kind of warmth and comfort that only freshly baked bread can bring.
Why You’ll Love This Baguette (The Easiest Recipe) Recipe
What really excites me about this baguette recipe is the way the flavors develop with just a few simple ingredients. The crust is perfectly golden and crisp, giving way to an interior that’s light, airy, and tender. It has that nostalgic French flair that you often don’t find in store-bought bread, and I love how it pairs well with so many dishes – from soups to sandwiches or just a dab of butter.
I also adore how easy this recipe is to make, especially for someone like me who isn’t a professional baker. It’s minimal fuss but still allows you to enjoy the proud feeling of making bread from scratch. I often bring these baguettes to family dinners and parties because they’re such a crowd-pleaser. Plus, baking this baguette feels like a little celebration every time, especially when friends compliment that incredible crunchy crust and irresistible aroma. This recipe truly stands out because it balances simplicity with impressive results.
Ingredients You’ll Need

The magic behind this Baguette (The Easiest Recipe) Recipe lies in its straightforward ingredients list. Every pantry staple plays a key role — flour for structure, yeast to make it rise beautifully, salt to boost flavor, sugar to feed the yeast, and warm water to bring everything together into a perfect dough.
Pro Tip ✨
Check out the full list of ingredients and measurements in the recipe card below.
- All-purpose flour: Provides the perfect structure and chew for the classic baguette texture.
- Warm water (110°F/43°C): Activates the yeast gently without killing it, ensuring a good rise.
- Active dry yeast: The magical agent that makes the dough expand and get fluffy inside.
- Salt: Enhances flavor and also strengthens the dough’s gluten network.
- Sugar: Feeds the yeast so it can work its rising magic more efficiently.
Directions
Step 1: Begin by preparing your yeast. Mix the warm water and sugar in a bowl, then sprinkle the active dry yeast on top. Let it sit for 5 to 10 minutes until it becomes foamy. This foaming means your yeast is active and ready to work.
Step 2: In a large mixing bowl, combine the all-purpose flour and salt. Slowly add the yeast mixture to the flour while stirring until you form a shaggy, rough dough. It will look rustic at first, but that’s exactly what you want.
Step 3: Turn your dough out onto a lightly floured surface and knead it for about 8 to 10 minutes. This kneading step is key — it develops the gluten and creates that smooth, elastic texture you want in a great baguette dough.
Step 4: Place the kneaded dough in an oiled bowl and cover it with a damp cloth or plastic wrap. Find a warm, draft-free spot and let it rise until doubled in size, which takes about 1 hour. You’ll notice the dough becoming light and airy as it expands beautifully.
Step 5: Once risen, punch down the dough to release the air, then divide it into two equal pieces. Roll each piece into a baguette shape, about 12 to 14 inches long. This shaping step sets the classic silhouette that makes baguettes instantly recognizable.
Step 6: Place your baguettes on a parchment-lined baking sheet and cover them again for a second rise for about 30 minutes. Meanwhile, preheat your oven to 450°F (232°C).
Step 7: Just before baking, make several slashes on top of each baguette with a sharp knife or razor blade. This allows steam to escape and gives the bread that signature crusty look. Bake for 20 to 25 minutes until golden brown and crusty. Let them cool slightly before slicing—you’ll be rewarded with the perfect crust cracking under your knife.
Servings and Timing
This recipe yields about 20 slices, which I usually count as 10 servings. Preparing the dough, including kneading and the first rise, will take you about 1 hour and 15 minutes. The final rise before baking adds another 30 minutes, and the bake time itself is roughly 20 to 25 minutes. In total, you’re looking at about 2 hours from start to finish, including resting times, though the hands-on activity is probably around 15 to 20 minutes. It’s well worth the wait!
How to Serve This Baguette (The Easiest Recipe) Recipe

When it comes to serving this baguette, I love keeping it simple to highlight its fresh bread flavor. Warm slices with a pat of butter are honestly one of my favorite quick ways to enjoy it. The buttery melt-soaked bread with a crunchy crust is pure comfort. For a heartier approach, I like slicing thick pieces to make sandwiches with fresh cheese, cured meats, and crisp vegetables—this baguette stands up perfectly to robust fillings without getting soggy.
Presentation-wise, I often serve the baguette whole on a rustic wooden board with a small bowl of olive oil mixed with herbs for dipping. It adds such a lovely touch and makes sharing a joy. For beverages, a glass of chilled white wine or even a light cocktail complements the texture and flavor beautifully. When serving to guests, I like to offer a variety of cheeses alongside it, turning the baguette into the perfect base for an indulgent cheese and charcuterie platter. I recommend serving the bread warm or at room temperature to get the most out of that irresistible crust and soft crumb.
This baguette is also perfect for family dinners, holiday meals, or even casual weeknight bites. I find it so versatile that whether you’re having a fancy celebration or just a cozy meal, it fits right in and adds that little extra something special to the table.
Variations
I love experimenting with this baguette recipe to suit different tastes or dietary needs. For example, swapping out all-purpose flour for bread flour gives a chewier crust that some people really enjoy. If you want a bit more flavor, adding a tablespoon of whole wheat flour or rye flour can introduce a subtle earthiness to the bread.
If you need a gluten-free version, I’ve tried using a gluten-free all-purpose mix combined with xanthan gum, and while the texture changes somewhat, you still get a lovely loaf with a crisp crust. For vegans, this recipe already fits perfectly since it uses no animal products, which I really appreciate because it’s inclusive and delicious.
Flavor-wise, you can sprinkle some sesame seeds or coarse sea salt on top before baking to add a little extra dimension and crunch. Some bakers like to add fresh herbs like rosemary or thyme to the dough for an aromatic twist. Alternatively, baking the shaped baguettes on a preheated baking stone can give you an even crisper crust if you want to take it up a notch.
Storage and Reheating
Storing Leftovers
If you have leftover baguette slices, I recommend storing them in a paper bag or loosely wrapped in a clean kitchen towel. This helps the crust stay crisp longer. If you use plastic wrap or airtight containers, the crust will soften quickly due to trapped moisture. Stored this way, your baguette will keep well for up to 2 days, and you can always refresh the crust by briefly warming it.
Freezing
Yes, this baguette freezes wonderfully! To freeze, slice the bread first, then arrange the slices in a single layer on a baking sheet and freeze for about an hour. Once frozen, transfer the slices to a freezer-safe bag or container. This method prevents the slices from sticking together. Your baguette slices will keep for up to 3 months frozen. When you’re ready to eat, you can thaw at room temperature or toast them directly from frozen.
Reheating
Reheating is best done in the oven to bring back that crispy crust and warm, tender crumb. Preheat your oven to 350°F (175°C), wrap the baguette loosely in foil to avoid drying it out, and heat for 10 to 15 minutes. Avoid microwaving if you can, as it tends to make bread rubbery and soggy. If you want extra crispiness, unwrap the foil in the last few minutes of heating to let the crust crisp up nicely again.
FAQs
How important is the water temperature for this recipe?
Water temperature is very important because it activates the yeast properly. If the water is too hot, it can kill the yeast, and if it’s too cold, the yeast won’t activate effectively, leading to poor rising. Aim for about 110°F or 43°C—warm but not hot to your touch.
Can I use instant yeast instead of active dry yeast here?
Yes, you can substitute instant yeast for active dry yeast. With instant yeast, you can mix it directly with flour without proofing in warm water first. However, the proofing process in this recipe helps ensure the yeast is active, which is great for beginners to avoid failed rises.
Why do I need to make slashes on the dough before baking?
The slashes allow steam to escape during baking, which prevents the bread from bursting unpredictably and helps the baguette expand properly. They also create that iconic crusty look with beautiful patterns.
What should the dough texture feel like after kneading?
After kneading, the dough should be smooth, elastic, and slightly tacky but not sticky. It needs enough gluten development to hold its shape and trap the air bubbles that give the bread its airy interior.
Can I bake this baguette without a baking stone or steam injection?
Absolutely! While a baking stone and steam injection help create professional bakery-style crusts, this recipe works beautifully on a simple parchment-lined baking sheet. I’ve gotten great results just using a conventional oven without additional steam by making those top slashes and ensuring a hot oven temperature.
Conclusion
I really hope you give this Baguette (The Easiest Recipe) Recipe a try because nothing beats the joy of baking fresh bread at home. It’s straightforward, satisfying, and always impresses anyone who tastes it. Plus, filling your kitchen with that warm, yeasty aroma is such a comforting experience. From my heart to yours, happy baking — I can’t wait to hear how much you love it as much as I do!
Print
Baguette (The Easiest Recipe) Recipe
- Prep Time: 15 minutes
- Cook Time: 25 minutes
- Total Time: 1 hour 40 minutes
- Yield: Makes about 2 baguettes (20 slices, serves 10)
- Category: Bread
- Method: Baking
- Cuisine: French
Description
This straightforward baguette recipe offers an easy way for beginners to bake classic French bread at home. Featuring a golden, crispy crust and soft, airy interior, these baguettes are perfect for enjoying fresh with butter or making delicious sandwiches. The step-by-step guide ensures bakery-quality loaves with minimal fuss, filling your kitchen with the warm aroma of freshly baked bread.
Ingredients
Dry Ingredients
- 4 cups all-purpose flour
- 2 tsp active dry yeast
- 2 tsp salt
- 1 tsp sugar
Wet Ingredients
- 1 ½ cups warm water (110°F / 43°C)
Instructions
- Prepare the yeast: In a bowl, combine the warm water and sugar. Sprinkle the active dry yeast over the surface and let it sit for 5-10 minutes until the mixture becomes foamy, indicating the yeast is active.
- Mix the dough: In a large bowl, mix the flour and salt together. Gradually pour in the yeast mixture while stirring until a shaggy dough forms that starts to come together.
- Knead the dough: Transfer the dough to a floured surface and knead it for 8-10 minutes until it becomes smooth and elastic, which develops the gluten structure for good texture.
- Let it rise: Lightly oil a large bowl and place the kneaded dough inside. Cover the bowl with a damp cloth or plastic wrap and let it rise in a warm spot until doubled in size, about 1 hour.
- Shape the baguettes: Punch down the risen dough to release air, then divide it into two equal pieces. Roll each piece into a long log shape approximately 12-14 inches in length, resembling classic baguettes.
- Final rise & bake: Place the shaped baguettes on a parchment-lined baking sheet and cover them loosely. Let them rise for another 30 minutes while preheating your oven to 450°F (232°C). Just before baking, make several diagonal slashes on top of each loaf to allow steam to escape during baking. Bake the baguettes in the preheated oven for 20-25 minutes or until they turn a golden brown color with a crispy crust.
Notes
- Ensure the water temperature is warm (around 110°F / 43°C) to activate the yeast properly without killing it.
- Use a sharp knife or bread lame to make clean slashes on the dough before baking to help control expansion.
- For an even crispier crust, place a pan of water in the oven to create steam during the first 10 minutes of baking.
- This recipe yields 2 baguettes, about 20 slices total, perfect for serving 10 people.
- Store leftover bread in a paper bag at room temperature to keep crust crisp, or freeze for longer storage.


